One Button Studio
The Cline Library’s One Button Studio is a simplified video recording space that can be used without any previous recording experience. The design of the studio allows you to create high-quality videos without having to know anything about lights or cameras; all you need is a flash drive! To learn more about video production, visit our training guide.
-
How can I access the Studio? Tab Open
-
What equipment is in the Studio? Tab Closed
-
How do I use the Studio? Tab Closed
How can I access the Studio? Accordion Open
The One Button Studio is located in room 139 on the first floor of the Cline Library, adjacent to the Student Technology Center. NAU and CCC students, staff, and faculty are permitted to reserve the One Button Studio for up to two hours per day.
Visit our online scheduler to reserve the Studio today.
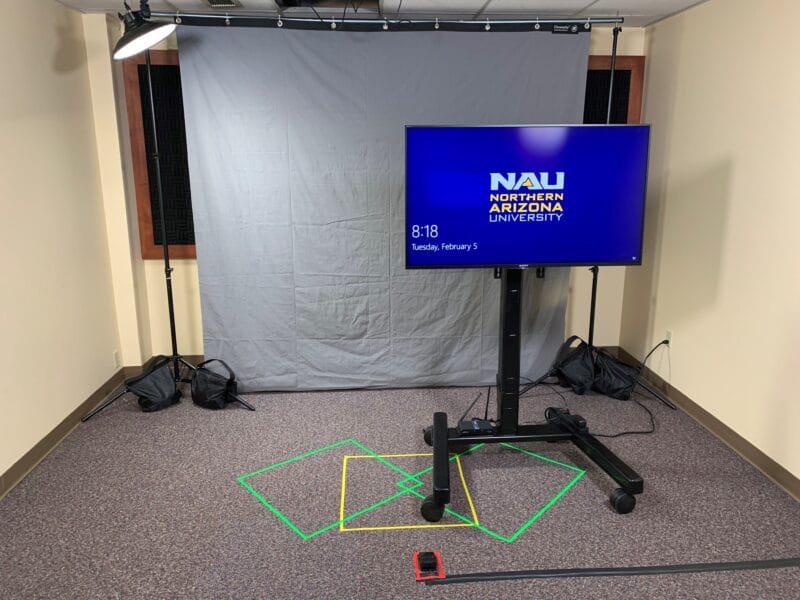
What equipment is in the Studio? Accordion Closed
- Mounted HD video camera
- Pre-set studio lighting
- Ceiling mounted microphone
- One Button console & screen
- Presentation console & screen
- Blue/green screen capabilities
- Interview stools (2)
- Interview chairs (2)
- Adjustable riser (1)
- Presentation clicker (1)
- Screen remotes (3)
How do I use the Studio? Accordion Closed
Before you Begin
- Visit the library’s Ask Us! Desk to confirm your reservation and check out a key to the Studio.
- Familiarize yourself with the features and capabilities of the One Button Studio.
- Please note that if you use the green/blue screen feature all background images must be added in post-production using video editing software (like Adobe’s Premiere Pro).
- Please do not move the camera, lights, or backdrop – these must remain stationary.
- Chairs, stools, and risers are available to help set the desired scene.
During your Experience
- To begin, log on to the One Button console with your NAU credentials.
- After a few moments a video preview should load on the One Button console screen. Please note that there is a slight lag in the video preview – this lag will not affect the final recording.
- Once you are ready to start your recording, click the “one button” on the floor (in red) to begin your video.
- When you are finished with your recording, click the “one button” a second time to complete your video.
- Your video will be automatically saved to your Bonsai account in the standard mp4 format. Please note that you are welcome to record as many takes/videos as you would like, but each will be saved as a separate mp4 file.
- If you intend to use the green/blue screen feature of this studio please note that you are unable to change the background in real time. All green/blue screen effects must be done after your video has been recorded using a post-production video editing program like Adobe Premiere Pro.
- If you’d like to use the presentation console and screen to display a PowerPoint presentation or other image, please log in using your NAU username and password.
Before You Leave
- If you used the presentation computer please remember to log out of your account.
- Ensure all monitors, TV screens, and green/blue screen controls are powered down.
- Return all furniture and equipment to its original state as when you entered.
- Be sure to collect all of your personal belongings, supplies, and any trash.
- Turn off the studio lights and lock the door as you exit.
- Return the One Button Studio key to the Ask Us! Desk.
Thank you for using the One Button Studio!
Best Practices
Scripting Accordion Closed
Scripting your speech or presentation is highly recommended. In general it will make your presentation more professional with a consistent tone and flow and will make it much easier to add closed captions to your video.
What to wear (and not to wear) Accordion Closed
Generally you want to avoid wearing distracting clothes, or clothes that will blend in the background (white, yellow, lighter pastel colors), along with elaborate and/or shiny jewelry. Darker colors are usually a good bet. If you are using the green screen, do not wear green yourself.
Recording Accordion Closed
Duration – Try to keep your video recording short, between three and five minutes in length. If your content requires more time, consider breaking your recording into shorter segments.
Eye Contact – When you are presenting, look at the camera. This will make it appear like you are making eye contact with your audience which will increase their engagement.
Audio and Tone – The OBS uses a high quality shotgun microphone to record audio, which results in a nice recording of your voice most of the time. Still, keep in mind the volume at which you are speaking, and your location relative to the microphone.
Presentations Accordion Closed
In general, keep slides as simple as possible and avoid any flashy transitions or animations unless absolutely necessary. Use dark background slides to avoid contrast issues.